
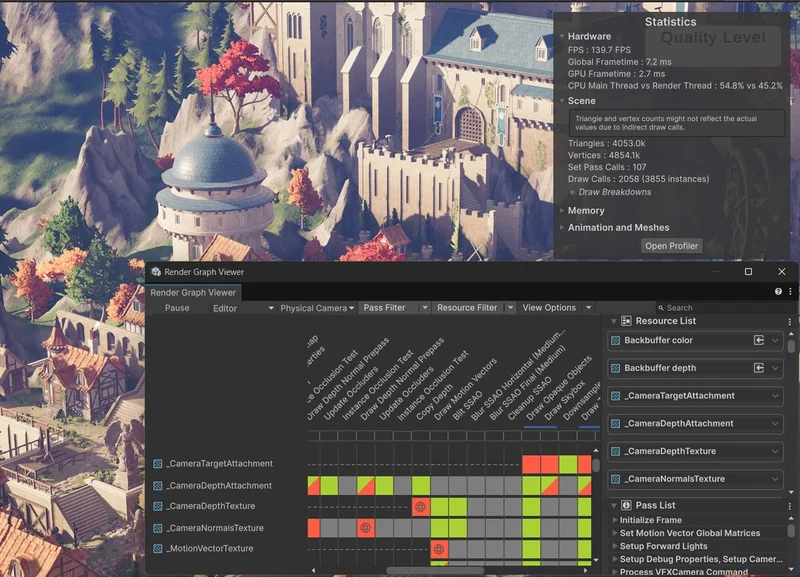
Unity 6 URP Render Graph — 5-Part Series
Part 1: Fundamentals and How It Works
Part 2: Pass Types Deep Dive
Part 3: Mastering the Render Graph Viewer
Part 4: Migration — Preparation
Part 5: Migration — Execution and Operations
After updating a project to Unity 6.3, many developers are greeted by a warning that stops them in their tracks:
“The project currently uses compatibility mode where the render graph API is disabled.”
Compatibility Mode. It doesn’t break anything immediately, but the message is clear: Unity is phasing out the Execute-based ScriptableRenderPass approach. You can ignore this warning and move on — but at some point, it’s worth asking: why did Unity feel the need to overhaul the rendering architecture in the first place?
This article answers that question while covering the core concepts of Render Graph and walking through your first custom pass implementation. Rather than a step-by-step tutorial, the focus here is on why this architecture had to exist.
Key Takeaways
–ScriptableRenderPass: developers manually manage memory and dependencies — complexity explodes as projects grow
–RecordRenderGraph= declaration, not execution. GPU commands run after Render Graph analyzes all dependencies
–TextureHandle= no immediate memory allocation. Memory is reserved only when the system determines it’s needed
– A Tinting Effect implementation walks through all three concepts in practice
Table of Contents
- The Limitations of the Old ScriptableRenderPass
- What Is Render Graph?
- Core Classes — RendererFeature and RenderPass
- RecordRenderGraph — “Declaration, Not Execution”
- Texture Handle — No Immediate Memory Allocation
- Implementing Your First Custom Pass: Tinting Effect
- Wrap-Up — What’s Next
The Limitations of the Old ScriptableRenderPass
For years, URP supported rendering customization through ScriptableRenderPass. The workflow was straightforward: create a pass, set its order, add it to the pipeline, and issue GPU commands directly inside the Execute method.
Here’s what a simple screen tinting effect looked like under that model.
// TintingFeature.cs — RendererFeature handles pass creation and registration
using UnityEngine;
using UnityEngine.Rendering;
using UnityEngine.Rendering.Universal;

public class TintingFeature : ScriptableRendererFeature
{
    private TintingPass m_Pass;

    public override void Create()
    {
        m_Pass = new TintingPass(RenderPassEvent.AfterRenderingOpaques);
    }

    public override void AddRenderPasses(ScriptableRenderer renderer, ref RenderingData renderingData)
    {
        renderer.EnqueuePass(m_Pass);
    }
}
// TintingPass.cs — RenderPass issues actual GPU commands immediately inside Execute
using UnityEngine;
using UnityEngine.Rendering;
using UnityEngine.Rendering.Universal;

public class TintingPass : ScriptableRenderPass
{
    private RenderTargetIdentifier m_Source;
    private RenderTargetHandle m_TempTexture;
    private Material m_TintMaterial;

    public TintingPass(RenderPassEvent evt)
    {
        renderPassEvent = evt;
        m_TempTexture.Init("_TempTintTexture");
    }

    public override void OnCameraSetup(CommandBuffer cmd, ref RenderingData renderingData)
    {
        m_Source = renderingData.cameraData.renderer.cameraColorTarget; // Direct render target reference
        RenderTextureDescriptor desc = renderingData.cameraData.cameraTargetDescriptor;
        cmd.GetTemporaryRT(m_TempTexture.id, desc); // Manual texture allocation
    }

    public override void Execute(ScriptableRenderContext context, ref RenderingData renderingData)
    {
        CommandBuffer cmd = CommandBufferPool.Get("TintingPass");

        // **↓ Queuing GPU commands into the CommandBuffer (not yet executed)**
        Blit(cmd, m_Source, m_TempTexture.Identifier());                // Command 1: Copy source → temp texture
        Blit(cmd, m_TempTexture.Identifier(), m_Source, m_TintMaterial);// Command 2: Apply material, copy back to source
        // **↑ Up to this point, we've only built a command list on the CPU**

        context.ExecuteCommandBuffer(cmd); // Submit the queued commands to the GPU (actual execution happens here)

        CommandBufferPool.Release(cmd);
    }

    public override void OnCameraCleanup(CommandBuffer cmd)
    {
        cmd.ReleaseTemporaryRT(m_TempTexture.id); // Manual texture release
    }
}
This worked fine for smaller projects. As projects grew in complexity, though, several cracks started to show.
-
It’s difficult to track what’s happening where. You have to manually track which pass creates which Render Texture, who reads it, and when it gets released. Once code starts depending on global textures, dependency chains become tangled. Predicting how a change in one pass affects another becomes guesswork.
-
Memory management is entirely manual. The system has no awareness of textures that are no longer needed but still occupying GPU memory. All optimization responsibility falls on the developer.
-
Debugging is painful. When something looks wrong on screen, there’s no official tooling to trace which pass caused it. You were left digging through the Frame Debugger on your own.
Unity introduced Render Graph to solve these problems at the root. The philosophy: let the system manage what developers previously had to handle themselves.
What Is Render Graph?
Despite the name sounding like a visual editor, Render Graph is a programming interface. The “Graph” refers to the data structure — nodes and edges — from computer science.
Here’s how Render Graph works: rather than executing rendering operations directly, developers declare what resources each render pass reads and writes. The Render Graph system then analyzes these declarations, builds a dependency map, and automatically applies three optimizations.
| Optimization | Description |
|---|---|
| Culling unused passes | Passes that don’t contribute to the final output are automatically skipped |
| GPU memory reuse | Transient textures with non-overlapping lifetimes share the same memory |
| Pass merging | On tile-based GPUs (mobile), adjacent passes are merged to reduce memory bandwidth consumption |
Implementing these three manually is non-trivial. With Render Graph, they come for free.
Core Classes — RendererFeature and RenderPass
Before writing any Render Graph code, you need to understand the two key classes involved.
ScriptableRendererFeature is the manager. It holds properties exposed in the Inspector, creates pass instances, and registers them with the pipeline. This is the class you add to a Universal Renderer Data asset in the Unity Editor.
ScriptableRenderPass is the worker. The actual rendering logic lives here. In the old API, you wrote GPU commands directly inside Execute. With Render Graph, you declare intent inside RecordRenderGraph.
To create a new Renderer Feature, right-click in the Project view and choose Create → Rendering → URP Renderer Feature Script. Unity generates a boilerplate template with both classes already stubbed out.
RecordRenderGraph — “Declaration, Not Execution”
When you first encounter Render Graph, RecordRenderGraph can be confusing. It runs every frame, and the code inside it “creates” textures and “adds” passes. Does that mean memory is being allocated every frame?
No. That’s the core idea of Render Graph.
RecordRenderGraph is a recording phase, not an execution phase. Everything inside this method is a declaration: “I intend to use these resources and run this pass.” The actual GPU execution happens separately, after the Render Graph system has finished analyzing all declarations.
public override void RecordRenderGraph(RenderGraph renderGraph, ContextContainer frameData)
{
    // This method is 'declaration', not 'execution'
    var resourceData = frameData.Get<UniversalResourceData>();
    var source = resourceData.activeColorTexture;

    // Create a texture handle — this does NOT allocate memory
    var descriptor = renderGraph.GetTextureDesc(source);
    descriptor.name = "CameraColor_TintingPass";
    descriptor.clearBuffer = false;
    TextureHandle destination = renderGraph.CreateTexture(descriptor);

    // AddBlitPass — registers the pass (execution happens later)
    var blitParams = new RenderGraphUtils.BlitMaterialParameters(source, destination, material, 0);
    renderGraph.AddBlitPass(blitParams, "TintingPass");

    // Update the reference so subsequent passes use the modified texture
    resourceData.cameraColor = destination;
}
The fact that CreateTexture doesn’t actually allocate GPU memory can be disorienting at first. What it returns is a Texture Handle — essentially a reservation: “this texture will be needed at some point.” Actual memory is allocated only after the Render Graph system has analyzed all pass dependencies, and only at the moment the texture is genuinely required.
Texture Handle — No Immediate Memory Allocation
Let’s dig into why TextureHandle matters.
In the old system, you had to manage RenderTexture.GetTemporary() or RTHandle manually. Forget to release one after a pass, and you had a memory leak. Render Graph automates this entirely.
Internally, a TextureHandle wraps an RT Handle that starts out unallocated (null). The Render Graph system allocates memory only when it determines the texture is actually needed. If a texture is never used, it’s never allocated at all.
Unused textures are pruned at compile time by the Render Graph. This means defensive “just-in-case” allocations carry no performance cost — something that simply wasn’t possible under the old model.
Open the Render Graph Viewer (Window → Analysis → Render Graph Viewer) to see which textures each pass reads (green) and writes (red). Part 3 covers this tool in detail.

Implementing Your First Custom Pass: Tinting Effect
Let’s build a full-screen tinting effect from scratch to get a feel for how data flows through Render Graph. It’s a simple example, but it’s enough to develop a solid intuition for the system.
1. Renderer Feature Skeleton
using UnityEngine;
using UnityEngine.Rendering;
using UnityEngine.Rendering.Universal;

// ScriptableRendererFeature: The manager role exposed in the Inspector
// Once added to a URP Renderer Asset, it runs for every camera render
public class TintingRendererFeature : ScriptableRendererFeature
{
    // Convention: group Inspector-exposed settings into a nested serializable class
    [System.Serializable]
    public class Settings
    {
        public Material material;
        public RenderPassEvent renderPassEvent = RenderPassEvent.AfterRenderingPostProcessing;
    }

    public Settings settings = new Settings();
    private TintingRenderPass _pass;

    // Create(): Called once when the RendererFeature initializes — creates the pass instance
    public override void Create()
    {
        _pass = new TintingRenderPass();
        _pass.renderPassEvent = settings.renderPassEvent; // Set when the pass executes
    }

    // AddRenderPasses(): Called every frame per camera — registers the pass with the pipeline
    public override void AddRenderPasses(ScriptableRenderer renderer, ref RenderingData renderingData)
    {
        if (settings.material == null) return; // Skip registration if no material is assigned
        _pass.Setup(settings.material);
        renderer.EnqueuePass(_pass); // Add the pass to the renderer queue
    }
}
2. Render Pass — Implementing RecordRenderGraph
using UnityEngine;
using UnityEngine.Rendering;
using UnityEngine.Rendering.Universal;
using UnityEngine.Rendering.RenderGraphModule;      // RenderGraph, TextureHandle
using UnityEngine.Rendering.RenderGraphModule.Util; // BlitMaterialParameters, AddBlitPass

public class TintingRenderPass : ScriptableRenderPass
{
    private Material _material;

    // This pass needs access to the current color buffer, so an intermediate texture is required
    public TintingRenderPass()
    {
        requiresIntermediateTexture = true;
    }

    public void Setup(Material material) => _material = material;

    public override void RecordRenderGraph(RenderGraph renderGraph, ContextContainer frameData)
    {
        var resourceData = frameData.Get<UniversalResourceData>();

        // Cannot run when targeting the back buffer directly
        // (intermediate textures are only available before AfterRendering)
        if (resourceData.isActiveTargetBackBuffer)
        {
            Debug.LogWarning("TintingPass: Cannot run when the active target is the back buffer.");
            return;
        }

        var source = resourceData.activeColorTexture;
        var descriptor = renderGraph.GetTextureDesc(source);
        descriptor.name = "CameraColor_TintingPass";
        descriptor.clearBuffer = false;

        TextureHandle destination = renderGraph.CreateTexture(descriptor);

        var blitParams = new RenderGraphUtils.BlitMaterialParameters(source, destination, _material, 0);
        renderGraph.AddBlitPass(blitParams, "TintingPass");

        // Update the reference so subsequent passes use the modified texture
        resourceData.cameraColor = destination;
    }
}
3. Creating the Material with Shader Graph
Select Create → Shader Graph → URP → Fullscreen Shader Graph to create a fullscreen shader graph. Set the URP Sample Buffer node’s Source Buffer to Blit Source, multiply it by your desired tint color using a Multiply node, and connect the result to the Fragment output.


After saving the shader graph, create a material and link it:
- In the Project window, select Create → Material to create a new material.
- Click the Shader dropdown at the top of the Inspector and search for the Shader Graph you just created.
- Alternatively, right-click the Shader Graph asset and select Create → Material — this creates a material already linked to that shader.
4. Registering the RendererFeature and Assigning the Material
- Select your URP Renderer Asset in the Project window (e.g.,
UniversalRenderPipelineAsset_Renderer). - Under Renderer Features in the Inspector, click Add Renderer Feature → TintingRendererFeature.
- Assign the Shader Graph material from Step 3 to the Settings → Material field of the added feature.
- Leave Render Pass Event at its default value of
After Rendering Post Processing.

5. Verifying in the Render Graph Viewer
- Enter Play Mode.
- Open Window → Analysis → Render Graph Viewer to see the current frame’s pass list.
- Find TintingPass in the column list. Since we set
RenderPassEvent.AfterRenderingPostProcessing, it should appear betweenBlit Post ProcessingandBlit Final To Back Buffer. - Click the TintingPass column to highlight the texture resources this pass reads and writes.
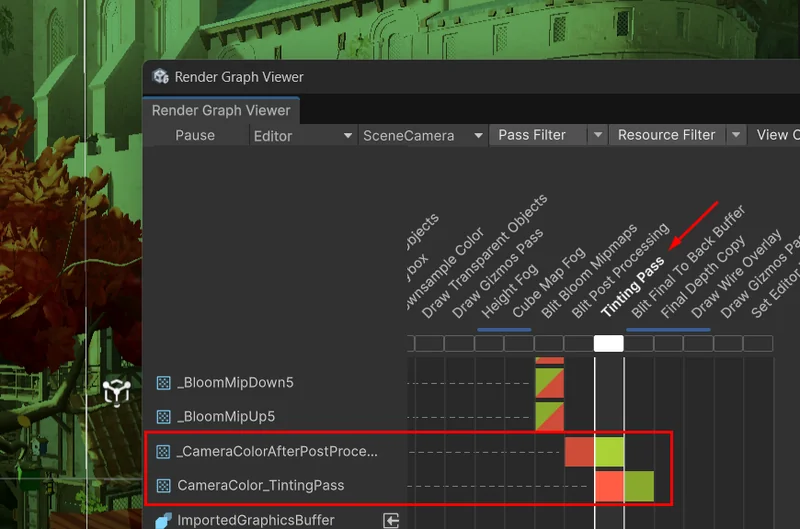
With the Tinting Effect in place, the Render Graph Viewer shows TintingPass sitting between Blit Post Processing and Blit Final To Back Buffer — exactly where you’d expect, given the AfterRenderingPostProcessing timing.
One thing to note: it does not merge with adjacent passes. That’s because AddBlitPass uses an Unsafe Pass internally. Which passes can merge and which can’t — and what that means for performance — is the topic of Part 2.
Wrap-Up
At its core, Render Graph is about a shift in control. The old model required developers to manually handle Render Texture allocation, release, and dependency ordering. Render Graph takes over that responsibility. In return, all you need to do is declare what each pass reads and writes. The declarative mindset feels unfamiliar at first, but once it clicks, going back feels like a step backward.
Two things to internalize: RecordRenderGraph is recording, not execution. CreateTexture is a reservation, not an allocation. Grasp those two and you’ve understood half the system. The other half is knowing which pass type to reach for in which situation.
Part 2 covers the six Add methods — AddBlitPass, AddCopyPass, AddRasterRenderPass, and others — explaining when to use each and why their merge eligibility differs. It’ll also explain why the Tinting Effect didn’t merge.
Further Reading
Resources I referenced and verified while writing this post.
- Introduction to the Render Graph in Unity 6 — Unity YouTube
Official Unity tutorial video. A solid entry point for understanding Render Graph flow through a Dither Effect implementation, and where I first confirmed the basics of the Render Graph Viewer. - Render Graph Samples Part 1 — Unity YouTube
Walks through three samples — Blit, Blit with Material, and Frame Buffer Fetch — at the code level. Useful for understanding howAddBlitPassworks internally. - Introduction to the render graph system — Unity Docs
The official explanation of the separation between the recording phase and execution phase. The authoritative source confirming thatRecordRenderGraphis purely declarative. - Write a render pass using the render graph system — Unity Docs
The official reference forRecordRenderGraphimplementation and thePassDatapattern. Used as the baseline for the code skeleton in this post.
← Previous: None (Part 1) Next → Part 2: Pass Types Deep Dive — AddBlitPass vs AddRasterRenderPass