
Unity AI Complete Mastery Series
Part 1 — Unity AI Assistant Complete Beginner’s Guide: Ask, Plan & Agent Modes (this post)
Part 2 — Unity MCP Complete Guide: Connecting Claude Code, Codex, Gemini & Cursor to Unity Editor
Part 3 — Building Custom Unity MCP Tools: McpTool Deep Dive and 4 Registration Methods
Part 4 — Automating AI Workflows with the Unity Skills System: SKILL.md Complete Guide
Appendix — Unity MCP Built-in Tools Complete Reference: Parameters & Activation Guide for 51 Tools
Part 5 — Unity AI Assistant Project Overview Auto-Generation: Making AI Understand Your Project
Part 6 — Unity AI Assistant × Profiler: Diagnose Performance Bottlenecks in Plain Language
Agent AI has finally arrived inside the Unity Editor. If you’ve been watching Cursor edit codebases directly and Claude Code execute terminal commands, wondering “when will Unity get something like this?” — the answer is now.
With Unity AI Assistant (com.unity.ai.assistant), a single natural-language command inside the Unity Editor can modify scenes, add components to GameObjects, generate code, and create assets.
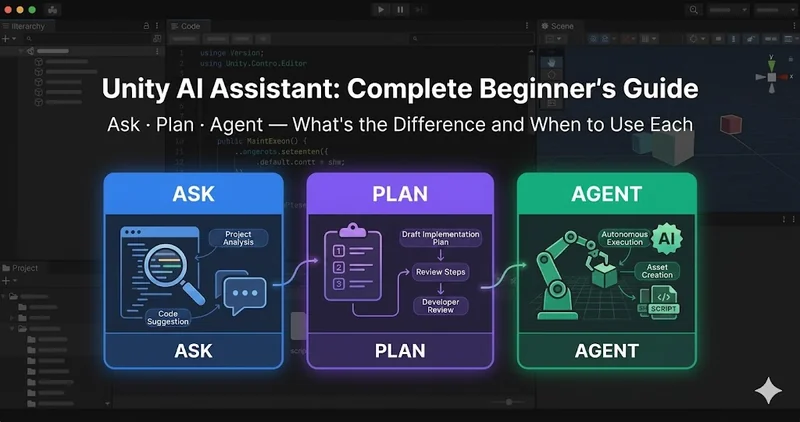
When you first open the tool, you’re faced with a choice: Ask, Plan, or Agent. Which mode you pick determines the entire character of what the AI does next. This post breaks down how each mode works and when to use which, based on the official documentation.
TL;DR
– Ask: Read-only. Inspects your project directly to explain and suggest. Never modifies your project.
– Plan: Writes an implementation plan → you review and approve → automatically switches to Agent to execute.
– Agent: Directly modifies scenes and assets. Control it safely with permissions and optional Checkpoints.
– Generators: Seven separate asset creation tools. Require Unity 6.3 (6000.3) or later.
– Installation: Addcom.unity.ai.assistantvia Package Manager. Unity 6.0.66f2+ recommended.
Table of Contents
- What Is Unity AI Assistant?
- Three Modes at a Glance
- Ask Mode — AI That Reads and Answers
- Plan Mode — AI That Plans Before Acting
- Agent Mode — AI That Acts Directly
- Real-World Scenarios: When to Use Which
- Scenario 1 — When you want to know how to build something
- Scenario 2 — When designing a complex feature from scratch
- Scenario 3 — When you have a clear task and want it done now
- Analyzing Profiler Data
- Installation
- Prompt Writing Tips
- Caveats
What Is Unity AI Assistant?
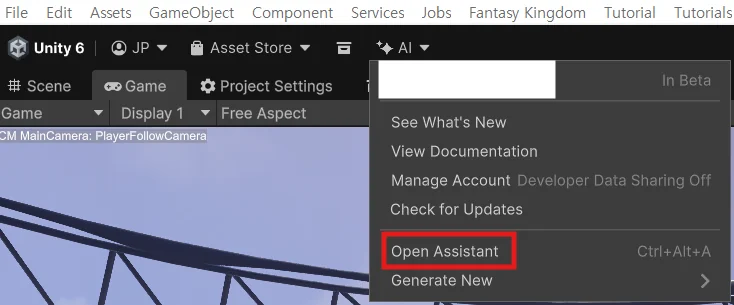
Unity AI Assistant is a generative AI tool integrated into the Unity Editor. A single natural-language prompt handles asset creation, workflow automation, performance analysis, and project manipulation. Install it by opening Package Manager, selecting Install package by technical name…, and entering com.unity.ai.assistant. Once installed, an AI menu appears at the bottom of the main menu bar. Launch the Assistant from AI > Assistant.
Internally, it’s built around three operating modes and a separate Generators suite. Generators are standalone tools for creating Sprites, Texture2Ds, Sounds, Animations, Materials, Cubemaps, and 3D Objects — but they’re also accessible from within the Assistant window via prompts. Among them, the Material Generator can also produce Terrain Layer maps (Diffuse, Normal, Mask) for use with Unity Terrain. Every request to Ask, Plan, or Agent modes and every asset generated by Generators consumes Unity Credits. Each interaction draws down your balance a little. You can check your remaining credits from the AI menu in the Unity Editor or on the Unity Dashboard.
Three Modes at a Glance
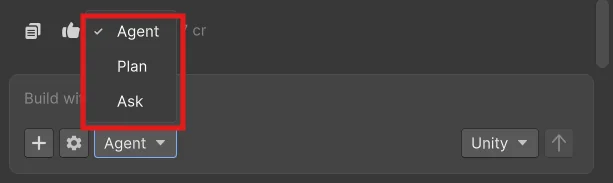
Here’s the official documentation’s mode comparison table:
| Ask | Plan | Agent | |
|---|---|---|---|
| Scene / asset modification | None | None (executes after approval) | Direct modification |
| Tool access | Read-only | Plan phase: read-only | Read + write |
| Saves plan to project | No | Saved to Assets/Plans/ |
No |
| Requires approval | No | Yes | Depends on permission settings |
| Primary use | Learning, analysis, review | Complex workflows | Direct changes, automation |
Ask Mode — AI That Reads and Answers
Ask mode is read-only. It answers questions, suggests code, and recommends settings and best practices — without touching your project. What makes it more than a simple chatbot is that it uses read-only tools to directly inspect your project and answers based on that context. Ask about the light intensity in your scene, and the Assistant will actually read the scene data before making its recommendation.
Because Ask mode never writes, no approval popup appears. If a specific operation is blocked under your read permission settings, the Assistant simply skips that information.
Three situations where it’s particularly useful:
- When you want to know how to implement something — The Assistant walks through the steps or shows example code, but nothing is applied to your project.
- When diagnosing a bug — Attach the Console error message, relevant code, component settings, and a description of expected vs. actual behavior for the sharpest analysis.
- When analyzing Profiler data — Covered in a later section.
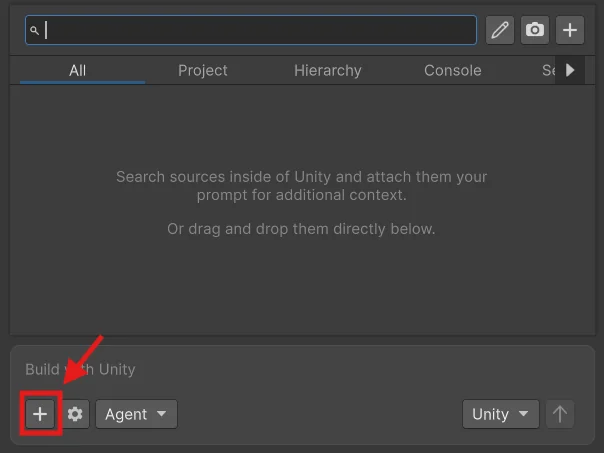
Use the + button next to the prompt field to attach GameObjects, assets, Console logs, or screenshots.
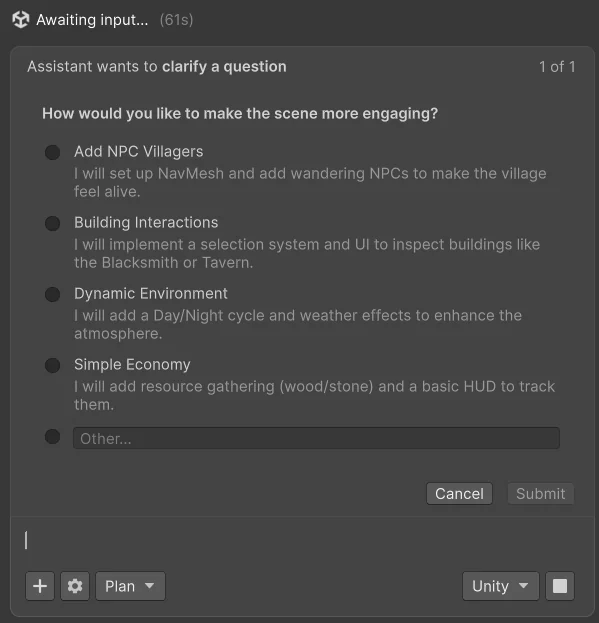
Plan Mode — AI That Plans Before Acting
Plan mode drafts a step-by-step implementation plan for complex tasks, lets you review and approve it, then executes. It’s best suited for wide-scope work like designing a gameplay system or wiring up multiple interconnected project elements. For simpler tasks — creating a single GameObject or changing one setting — go straight to Agent mode.
The full Plan mode flow:
- Enter your prompt.
- The Assistant may ask clarifying questions if needed.
- A step-by-step implementation plan is generated and saved as a
.mdfile inAssets/Plans/. You can open and review it outside the Assistant window. - Review the plan — before approving, you can request changes. Give feedback on the title, step order, or implementation direction and the Assistant will update the plan.
- Click Approve. The Assistant automatically switches to Agent mode and asks whether to proceed with implementation.
- Once confirmed, you can track each step’s progress via checklist. A summary is provided on completion.
Agent Mode — AI That Acts Directly
Agent mode directly modifies your actual scenes and assets. It handles multi-step tasks — creating, modifying, and deleting objects, changing assets, adjusting settings — by combining reasoning with tool calls. You can enter Agent mode automatically from an approved Plan, or select it directly from the start.
For text-only questions that don’t require action, Agent mode returns a text response. It always has access to a broader tool set than Ask mode, and when a prompt calls for creation or modification, it acts.
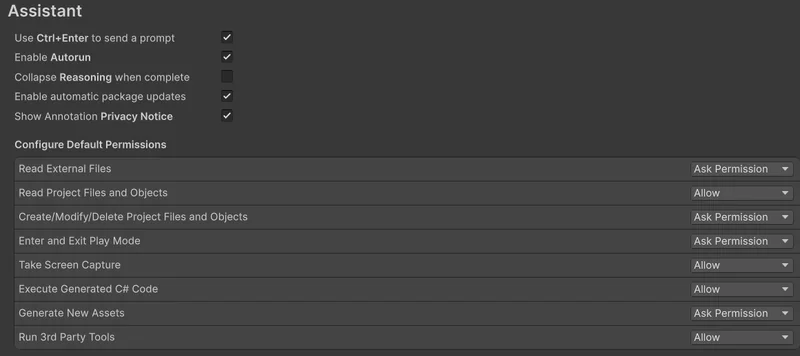
Permission settings have three levels:
- Allow: The Assistant performs the action automatically without confirmation.
- Ask Permission: Requests your approval before each action.
- Deny: Blocks the action entirely.
Configure permissions at Edit > Preferences > AI > Assistant (macOS: Unity > Settings > AI > Assistant). Enabling Autorun lets all Allow and Ask Permission actions run without interruption. Actions set to Deny stay blocked regardless of Autorun.
Checkpoint is the most important safety net in Agent mode. With Checkpoint enabled, a project snapshot is automatically created before any changes are applied each time you send a prompt. Click the flag icon in the conversation to restore that snapshot — rolling back not just what the Assistant changed, but any manual edits you made after that point as well. Checkpoints survive Unity Editor restarts.

Real-World Scenarios: When to Use Which
Scenario 1 — When you want to know how to build something
→ Ask Mode
Use this when you want to understand how to implement something. Enter a question like How do I create a weapon system? and the Assistant walks through the steps or provides example code — nothing is created in your project.
Ask mode is also the right call for bug analysis. Copy an error from the Console and paste it in, or attach it via the Attach menu. The more context you include — exact error message, relevant code, component settings, expected vs. actual behavior — the more useful the analysis.
Scenario 2 — When designing a complex feature from scratch
→ Plan Mode
Choose Plan mode for large-scale work spanning multiple files and systems. Send a request like Create a weapon system for my game. and the Assistant drafts a step-by-step plan saved to Assets/Plans/. Review it, adjust the direction, approve it — Agent mode takes over from there.
Scenario 3 — When you have a clear task and want it done now
→ Agent Mode
When execution is the goal — Add a weapon system to my game. — select Agent mode directly. It’s a good fit for well-scoped tasks: bulk-modifying scene objects, adding components, or tweaking settings. Depending on your permission settings, a confirmation popup appears before each action. With Checkpoint enabled, a snapshot is created automatically, so if the result isn’t what you expected, the flag icon rolls it back instantly.
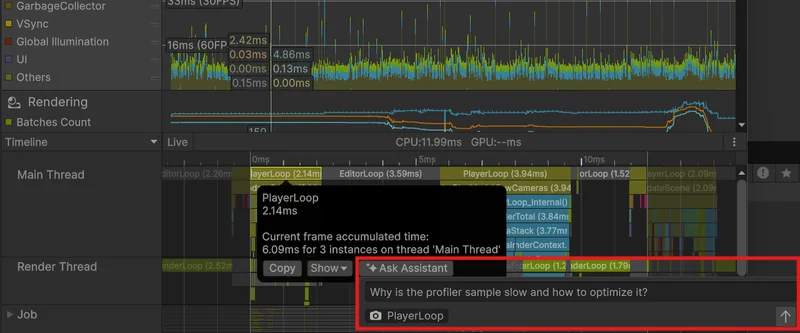
Analyzing Profiler Data
You can connect the Assistant directly to Unity Profiler for performance analysis. Here’s how:
- Open the Profiler window.
- Load a saved profiling session or record a new one.
- Switch to the Timeline view.
- Select the sample or frame you want to analyze.
- Select Ask Assistant.
An auto-generated prompt based on the selected sample appears. Edit it if needed — the profiling data is attached automatically. Submit, and the analysis shows up in the Assistant window.
Installation
In any Unity 6.0.60f1 or later project, open Window > Package Manager, select Add > Add package by name (newer versions: Install package by technical name…), and enter:
com.unity.ai.assistant
After installation, accept the terms via the AI menu at the bottom of the main menu bar. From there, open the Assistant window via AI > Assistant.
The Assistant itself works on Unity 6.0.60f1 and later, but Generators (asset creation tools) require Unity 6.3 (6000.3) or later. However, 6.0.60f1 has a known bug where packages with valid signatures are incorrectly flagged as invalid, so using 6.0.66f2 or later is the safer choice. For Generators, 6.3.5f2 or later is recommended for the same reason.
Prompt Writing Tips
The official documentation suggests structuring prompts in three parts:
Current state → Desired outcome → Technical specifics
I have a player using a CharacterController. I want to add a dash mechanic
that moves the player forward. Use the Input System and include a cooldown.
Vague requests like “Make a movement script.” get vague results. Spell out the current state and constraints, and the output gets a lot more accurate.
Using Unity-specific terminology improves response quality and produces results you can use directly in the Editor. The official documentation’s suggested replacements:
| Avoid | Use instead (Unity terminology) |
|---|---|
| 3D object | GameObject or Prefab |
| Properties | SerializedField, Component, public variable |
| Screen | Scene View, Game View, Canvas |
| Code file | Script or MonoBehaviour |
| Input/Controls | Input Action Asset, Input System, KeyCode |
| Image/Graphic | Sprite, Texture2D, Material, RenderTexture |
| Physics body | Rigidbody, Collider (Box/Sphere/Capsule/Mesh) |
| Animation | Animator, Animation Clip, Animator Controller |
For complex tasks, breaking requests into incremental steps produces more reliable results than packing everything into one prompt. Build the core feature first, layer in behaviors and interactions in the next prompt, then fine-tune.
For asset generation, the [subject] + [attributes] + [style/context] structure works best. Example: Generate a seamless PBR material of weathered stone for a dungeon environment.
Caveats
Unity Credits consumption: Usage varies by mode and task complexity. Monitor your usage and balance on the Unity Dashboard.
DLL conflicts: Third-party packages already in your project can cause DLL conflicts. Use Scripting Define Symbols to exclude the conflicting DLL from compilation — the official troubleshooting documentation walks through the steps.
Checkpoint retention and storage: Checkpoints are stored outside the Unity Editor via Git, so your project needs a version control system like Git configured. Retention can be set to 1 week or 2 weeks. Both the enabled state and retention period are configured at Edit > Preferences > AI > Assistant (macOS: Unity > Settings > AI > Assistant).
Wrapping Up
Ask, Plan, and Agent represent a spectrum of how much you delegate to the AI. Use Ask to check direction, Plan when you want to review before committing, Agent when you’re ready to let it run. The fastest way to build intuition is to alternate between Ask and Agent with Checkpoint enabled.
The next post will cover Unity AI’s Generators — the seven asset creation tools including Sprite, Texture2D, Material, Sound, and Animation — with real-world prompts.