
Unity AI Complete Mastery Series
Part 1 — Unity AI Assistant Complete Beginner’s Guide: Ask, Plan & Agent Modes
Part 2 — Unity MCP Complete Guide: Connecting Claude Code, Codex, Gemini & Cursor to Unity Editor
Part 3 — Building Custom Unity MCP Tools: McpTool Deep Dive and 4 Registration Methods
Part 4 — Automating AI Workflows with the Unity Skills System: SKILL.md Complete Guide (this post)
Appendix — Unity MCP Built-in Tools Complete Reference: Parameters & Activation Guide for 51 Tools
Part 5 — Unity AI Assistant Project Overview Auto-Generation: Making AI Understand Your Project
Part 6 — Unity AI Assistant × Profiler: Diagnose Performance Bottlenecks in Plain Language
Ask AI Assistant to do the same kind of task often enough and the explanation just keeps getting longer. Take something as simple as “place an enemy spawner in the level” — you end up spelling out every step: “create an empty GameObject, attach the EnemySpawner component, load the enemy prefab list from a ScriptableObject and wire it up, verify the spawner sits on the NavMesh, and check that the Gizmo shows up in the scene view.” Without that level of detail, the AI tends to skip a step. And the next time you ask for the same task, you’re writing those same instructions from scratch.
The Skills system was built to eliminate that repetition. Package your workflow instructions, the tools to use, and any required package conditions into a single SKILL.md file (case-sensitive), and the Assistant automatically discovers it every time the Editor opens — pulling it out exactly when it’s needed. Once created, you can share it across your entire team via .unitypackage.
Take the enemy spawner workflow above. Define those five steps once in Assets/AI/Skills/place-enemy-spawner/SKILL.md, and from then on a single line — "add an enemy spawner here" — is enough. The Assistant reads the description field, activates the skill automatically, and walks through all five steps in order. No more skipped EnemySpawner components, no more forgotten NavMesh checks. A new teammate joining the project gets the same result from the same one-liner, so the workflow doesn’t drift as it moves between people.
This post covers the structure and practical usage of the Skills system, targeting Unity 6.3 (com.unity.ai.assistant 2.7).
TL;DR
– Skills: Reusable AI workflow modules defined throughSKILL.mdfiles (case-sensitive)
– Auto-discovery: Place files inAssets/or the user skills folder — scanned automatically on Editor startup
– Progressive Disclosure: Only YAML metadata loads initially; detail files load on demand
– Static Utility Function: Callpublic staticC# methods from skills with no registration required
– Team sharing: Export as.unitypackage— teammates get auto-discovery as soon as they import
Table of Contents
- What Are Skills?
- Where to Place Files
- SKILL.md File Structure
- YAML Front Matter
- Body: Writing Natural-Language Instructions
- Support File Organization
- Progressive Disclosure — A Strategy for Preserving Context
- Static Utility Function
- Differences from AgentTool
- Utility Class Design Principles
- Referencing Unity Objects with Instance IDs
- Practical Example: The Red Top Hat Skill
- Testing & Validation
- Team Sharing (.unitypackage)
- Closing Thoughts
What Are Skills?
Skills are modular extensions for Unity AI Assistant that package workflow instructions and metadata for specific tasks. They go well beyond saved prompts. Inside a skill file you’ll find a task instruction manual — defining when to use the skill, which steps to follow in what order, and which C# methods in the project to call.
The official documentation highlights four core characteristics of Skills.
One practical tip: the official docs recommend against designing the skill file first. Instead, try the workflow directly in the Assistant chat, confirm it works, then capture it in SKILL.md. Locking down instructions that are already verified beats writing a skill from scratch every time.
One important caveat: Unity AI Assistant Skills are only loaded in the Unity Agent (Ask / Plan / Agent modes). Direct testing confirms that external agents — Claude Code, Codex, and others that connect via AI Gateway — each run inside their own harness and do not read Unity’s SKILL.md. For Claude Code, use CLAUDE.md or Claude Code-specific Skills; for Codex, use AGENTS.md. Each agent requires its own instruction file.
Where to Place Files
The Assistant automatically scans two locations.
| Type | Path | Scope |
|---|---|---|
| Project Skills | Anywhere inside the Assets/ directory |
Used only within that project |
| User Skills | Windows: %APPDATA%\Unity\AIAssistantSkillsmacOS: ~/Library/Application Support/Unity/AIAssistantSkills |
Shared across multiple projects on the same machine |
Project skills fit naturally into Git for team sharing, while user skills let you apply personal workflow preferences across all your projects at once. If the user skills folder doesn’t exist yet, create it via Edit > Project Settings > AI > Skills > Create user skills folder.
Skills are scanned on Editor startup and domain reload. If you add or modify a skill, start a new Assistant conversation for the changes to take effect — existing conversations won’t pick them up.
SKILL.md File Structure
YAML Front Matter
The recommended folder structure for a skill is as follows.
Assets/MySkills/
└─ my-test-skill/
   ├── SKILL.md
   ├── references/
   │   ├── api-notes.md
   │   └── common-patterns.md
   └── resources/
       ├── scenario_A.md
       └── template.cs
The full structure of the YAML front matter:
---
name: my-test-skill
description: Just a test skill. Activate it if we want to test skills.
required_packages:
  com.unity.inputsystem: ">=1.8.0"
  com.unity.cinemachine: ">=3.0.0, <4.0.0"
required_editor_version: ">=6000.3.13"
enabled: true
tools:
  - MyTools.Log
---
A summary of each field:
| Field | Required | Description |
|---|---|---|
name |
Required | Unique identifier for the skill. Convention is to match the folder name. |
description |
Required | What the skill does and when it should be activated. Used by the AI to decide when to activate it. |
required_packages |
Optional | Skill activates only if the specified packages are installed. |
required_editor_version |
Optional | Unity Editor version range required to activate the skill. |
enabled |
Optional | Set to false to disable. Defaults to true. |
tools |
Optional | List of custom tool IDs the Assistant can use while this skill is active. |
The description field is arguably the most important of all. The AI reads it to decide which skills to activate for a given user prompt. The more clearly you describe when to use this skill, the higher the auto-activation accuracy. One technical note: version strings containing operators like >= or < must be wrapped in quotes to avoid YAML parsing errors.
Body: Writing Natural-Language Instructions
The body of SKILL.md is free-form natural language — no fixed syntax required. Conversational directives work just fine. The expressions in the official documentation examples give you a clear sense of the style.
"Always confirm the target object before calling asset creation."— enforcing order"Never skip Step 3 (validation)."— absolute prohibition"Follow exactly one path. Do not mix steps from different paths."— branching rules"Take a screenshot to visually confirm the hat is correctly placed on the target object."— validation instruction
Beyond simple step lists, you can express branching logic (“follow path A under condition X”), mandatory validation gates, and hard constraints (“never do this”) — all in natural language. Keep SKILL.md under 500 lines where possible, and delegate detail to support files.
Support File Organization
resources/ and references/ are conventional names. You can use other names, but SKILL.md must reference them by their exact relative paths. Since only the files needed when a skill activates are loaded at that moment, they have no impact on initial context size.
Three commonly used patterns:
- Code templates:
"Use the template in 'resources/snippet.cs' to create the MonoBehaviour." - API reference:
"See 'references/my-api.md' for available methods and parameters." - Step-by-step guides:
"Follow the full placement procedure in 'resources/placement-steps.md'."
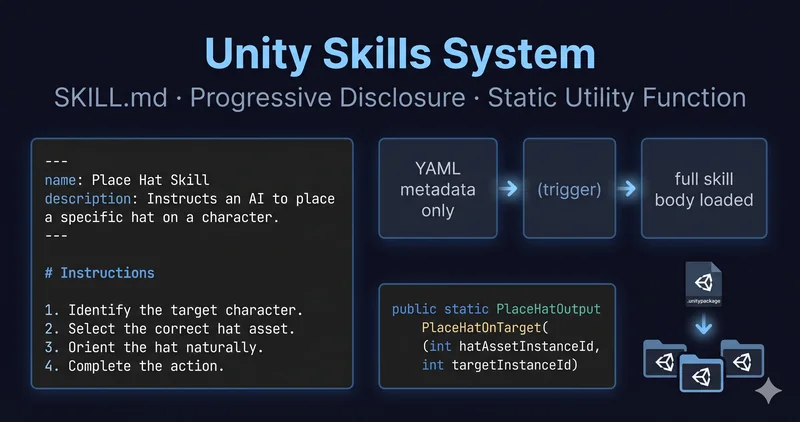
Progressive Disclosure — A Strategy for Preserving Context
Picture your project growing to five, then ten skills. If every SKILL.md‘s full content were loaded into the context window at conversation start, the AI would burn through available context fast. The Skills system solves this with Progressive Disclosure.
During the initial load, only the YAML front matter (name, description, and other metadata) enters the context window. Even with ten skills, only the metadata for each is loaded upfront. The moment a skill activates, its full body instructions and any required support files are loaded at that point.
Thanks to this design, context consumption stays minimal day-to-day even as your skill count grows. Support files (resources/, references/) are only loaded when a skill actually runs.
Static Utility Function
Differences from AgentTool
Both the [AgentTool] attribute and Static Utility Functions let the Assistant leverage C# methods, but the invocation mechanism is different.
[AgentTool] |
Static Utility Function | |
|---|---|---|
| Registration | Attribute required | Not required |
| How it’s called | AI calls it directly | Called via C# code generated by the skill |
| Parameter passing | AI determines the values | Specified explicitly in skill instructions |
| Best for | High-level reusable behaviors | Project-specific precise control |
[AgentTool] lets the AI call freely based on its own judgment, while Static Utility Functions have the skill instructions dictate when to call and with what parameters. The added benefit is that existing editor utility classes can be reused directly in skills without any attribute registration.
Utility Class Design Principles
Skill instructions invoke C# code using fully qualified method names (Namespace.ClassName.MethodName). Here are the utility class design principles outlined in the official documentation.
| Element | Purpose |
|---|---|
| Full class path | Allows skill instructions to locate the method (e.g., Acme.Editor.HatUtils.PlaceHatOnTarget()) |
| Clear parameter names and types | Ensures the AI constructs the method call with the correct values |
| Return struct with named fields | Lets the AI read values by name and chain them to subsequent steps |
Success field |
Gives the AI a consistent way to determine success or failure |
Message field |
Provides a description of the result or any error |
Collapsing the return type to a single string or bool makes it hard for the AI to pull values into subsequent steps. Return a struct (or class) with named fields instead — like this:
public static PlaceHatOutput PlaceHatOnTarget(int hatAssetInstanceId, int targetInstanceId, float yOffset = -0.1f)
{
    var prefab = EditorUtility.EntityIdToObject(hatAssetInstanceId) as GameObject;
    if (prefab == null)
        return new PlaceHatOutput { Message = $"No prefab found for instance ID {hatAssetInstanceId}." };

    var target = EditorUtility.EntityIdToObject(targetInstanceId) as GameObject;
    if (target == null)
        return new PlaceHatOutput { Message = $"No GameObject found for instance ID {targetInstanceId}." };

    // Position and instantiate ...
    return new PlaceHatOutput {
        Success = true,
        Message = $"Hat placed on '{target.name}'.",
        GameObjectInstanceId = hat.GetInstanceID(),    // passed to next step
        PrefabPath = AssetDatabase.GetAssetPath(prefab)
    };
}

[Serializable]
public class PlaceHatOutput
{
    public bool Success;
    public string Message;
    public int GameObjectInstanceId;
    public string PrefabPath;
}
For methods that modify scene objects, don’t skip Undo support. Use Undo.RecordObject() when changing existing objects and Undo.AddComponent<>() when adding new components, so users can revert with Ctrl+Z.
Referencing Unity Objects with Instance IDs
Static Utility Functions can’t take GameObject, Component, or UnityEngine.Object parameters directly. Instead, they use instance IDs — integer values assigned to each object in memory.
| Type | Naming Convention | Identifies |
|---|---|---|
int |
gameObjectInstanceId |
A specific GameObject in the scene |
int |
componentInstanceId |
A specific Component on a GameObject |
int |
assetInstanceId |
A project asset such as a prefab or texture |
int? |
Same as above | An optional object ID |
int[] |
gameObjectInstanceIds |
Multiple objects for batch processing |
Following the naming conventions lets the AI correctly identify objects from context. Using meaningful prefixes — like hatInstanceId and targetInstanceId — prevents the AI from confusing which ID goes to which method in multi-step workflows.
Practical Example: The Red Top Hat Skill
This is the complete example from the official Unity documentation. It packages a full workflow into a single skill: generate a 3D hat using AI, place it on a designated scene object, and validate the result with a screenshot.
This example is worth studying because it goes beyond simple step lists — it demonstrates real-world patterns: branching logic, mandatory preconditions, and validation steps all expressed in natural language.
YAML Front Matter:
---
name: create-red-tophat
description: Creates a red top hat 3D asset using AI generation and places it on the target object,
  fitting its XZ bounds to the target and positioning it at the top. Use when the user asks
  to create a top hat, put a hat on a character, or decorate an object.
---
Body Instruction Structure (key excerpts):
All C# APIs used by this skill are documented in `resources/hatutils-api-reference.md`.

## Required Rules

- Always confirm the target object before calling asset creation.
- Never skip Step 3 (validation).

## 1. Identify Target Object

## Path A: Use Selected Object
Follow this path only if the user mentions the current selection and an object is selected.
1. Get the instance ID of the selected object from the selection context.

## Path B: Specify Object by Name
Follow this path only if the user specifies an object name.
1. Call the `TestProject.Scripts.HatUtils.FindHatPlacements("<name>")` C# script.
2. Use the first match as the target and record its `GameObjectInstanceId`.

## Path C: No Target Specified
Follow this path only if no existing target has been specified.
1. Call the `TestProject.Scripts.HatUtils.FindHatPlacements()` C# script.
2. Ask the user to select a target from the result list.

Important: Follow exactly one path. Do not mix steps from different paths.

## 2. Create and Place Hat

1. Generate: Ask the model to "create a shiny red top hat." Record the asset's instance ID.
2. Place: Call `TestProject.Scripts.HatUtils.PlaceHatOnTarget(hatAssetInstanceId, targetInstanceId)`.
3. Fit collider: Call `TestProject.Scripts.HatUtils.FitHatCollider(hatInstanceId)`.

## 3. Validation

Take a screenshot to visually confirm that the hat is correctly placed on the target object.
If placement is incorrect, adjust and re-validate.
Do not repeat validation more than 3 times — instead, ask the user for input.
Those three red-highlighted lines are the skill’s backbone. Always run Step 3 validation. Always follow exactly one path. Never loop validation more than three times. These constraints prevent the AI from improvising and keep behavior predictable.
The actual resources/hatutils-api-reference.md contains the full signatures, parameter tables, and return struct fields for FindHatPlacements(), PlaceHatOnTarget(), and FitHatCollider(). This is the pattern: keep the skill body lightweight and push detailed API information into support files.
Testing & Validation
Confirming load: Open Edit > Project Settings > AI > Skills. The page is divided into three sections.
| Section | Contents |
|---|---|
| Project skills | Skills discovered in the current project’s Assets/ directory |
| User skills | Skills stored in the user skills folder |
| Skills with issues detected | Skills with parsing or validation problems |
If a skill ends up in “Issues detected,” it’s almost always one of three things: an empty skill file, a missing name or description field, or a missing --- delimiter. Use the Rescan button to re-run the scan and refresh results.
Confirming activation: In the Assistant conversation window, look at the Thoughts section. If you see Activate Skill with a skill_name parameter, the skill activated successfully. If it’s not showing up, first check whether the description field is specific enough.
Deciding whether a skill is worth it: Follow the official documentation’s recommended method.
- Pick a specific domain and scenario
- Run the same prompt without the skill 3–4 times
- Run the same prompt with the skill 3–4 times
- Compare results — create the skill only if there’s a measurable improvement
If the workflow already performs well without a skill, adding one risks introducing unnecessary complexity.
Team Sharing (.unitypackage)
Once a skill is created and tested, you can export it as a .unitypackage to share with teammates or other projects. This uses Unity’s standard asset package workflow.
What to include in the package:
- The complete skill folder, including
SKILL.md - Support files under
resources/andreferences/ - Editor scripts defining Static Utility Functions or custom tools (
[AgentTool])
When someone imports the package, the Assistant automatically discovers the included skills. No additional setup required — they’re ready to use the moment the Editor starts.
Closing Thoughts
The Skills system is what turns Unity AI Assistant into a team-scale workflow tool. Fix repetitive context explanations in SKILL.md, reach into project data with precision via Static Utility Functions, and ship everything via .unitypackage — this structure pays off more with every project that scales.
One last thing: trying to design a skill from scratch tends to lead you in circles. As the official docs recommend, run the workflow directly in the Assistant chat, confirm it works, then lock it into a file. A SKILL.md is a record of a workflow that’s already been validated — not a design document.
Related Posts
- Unity AI Assistant Complete Beginner’s Guide: Ask, Plan & Agent Modes — When to Use Each
- Building Custom Unity MCP Tools: McpTool Deep Dive and 4 Registration Methods
- Unity MCP Complete Guide: Connecting Claude Code, Codex, Gemini & Cursor to the Unity Editor
← Previous: Part 3 — Building Custom Unity MCP Tools: McpTool Deep Dive and 4 Registration Methods
→ Appendix: Unity MCP Built-in Tools Complete Reference — Parameters & Activation Guide for 51 Tools