
Unity AI Complete Mastery Series
Part 1 — Unity AI Assistant Complete Beginner’s Guide: Ask, Plan & Agent Modes
Part 2 — Unity MCP Complete Guide: Connecting Claude Code, Codex, Gemini & Cursor to Unity Editor
Part 3 — Building Custom Unity MCP Tools: McpTool Deep Dive and 4 Registration Methods
Part 4 — Automating AI Workflows with the Unity Skills System: SKILL.md Complete Guide
Appendix — Unity MCP Built-in Tools Complete Reference: Parameters & Activation Guide for 51 Tools
Part 5 — Unity AI Assistant: Auto-Generate Project Overview So AI Understands Your Project (this post)
Part 6 — Unity AI Assistant × Profiler: Diagnose Performance Bottlenecks in Plain Language
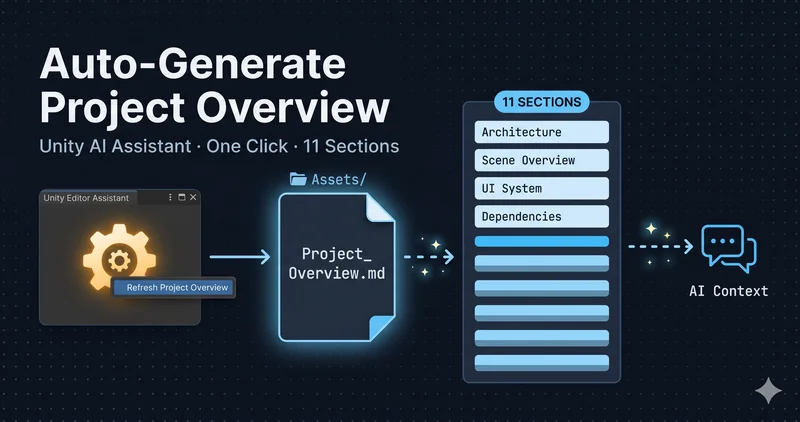
What if the AI knows nothing about your project structure every time you open the prompt field? If you have to explain “our project has three scenes, we use a manager pattern, and…” repeatedly, the word productivity starts to feel hollow. Refresh Project Overview solves exactly this. The Assistant scans your project, auto-generates a structured technical document (Project_Overview.md) with 11 sections, and references that document as context for every subsequent response. Here’s how it works and how to make the most of it — based on Unity 6.3.
TL;DR
– Access via Gear icon (⚙) → Refresh Project Overview inside the Assistant text field
– GeneratesAssets/Project_Overview.md— a structured technical document with 11 sections
– After generation, the Assistant references this file as context for all responses
– Manual edits are possible, but regenerating overwrites them
– Best generated once the project structure has stabilized; regenerate after major structural changes
Table of Contents
- How to Access Refresh Project Overview
- Where Project_Overview.md Is Generated
- Full Structure: All 11 Sections
- How AI Context Referencing Works
- Manual Edits and Overwrite Behavior
- When to Regenerate
- Generate After the Project Structure Stabilizes
- FAQ
How to Access Refresh Project Overview
Getting there is a two-step process. Click the Gear icon (⚙) inside the text field of the Assistant window to open the prompt settings menu, then select Refresh Project Overview to start the scan.
The Assistant window must be open and a conversation must already be active. Without an active conversation, the prompt settings menu is not accessible.
The scan runs in the background, so you can keep using the Assistant while it runs — no need to wait before asking your next question.
Where Project_Overview.md Is Generated
When Refresh Project Overview runs, the Assistant scans the project hierarchy and analyzes its systems to generate a comprehensive technical document. The file is saved directly under the Assets folder as Project_Overview.md.
YourProject/
└── Assets/
    └── Project_Overview.md   ← auto-generated here
You can view the file directly in the Unity Editor’s Project window, or open it in any text editor to review its contents.
Full Structure: All 11 Sections
The generated Project_Overview.md is organized into 11 sections. Knowing what each section covers makes it easier to decide where to add content when manually supplementing the document.
| Section | What It Covers |
|---|---|
| Project Overview | The project’s purpose, target audience, and core features that define the experience |
| Gameplay Flow / User Loop | The flow a user experiences from launch to exit, including key states and transitions |
| Architecture (Runtime + Editor) | Interactions between major systems, key scenes, managers, patterns, and data flow |
| Scene Overview | List of key scenes, each scene’s role, how scenes are loaded, and scene flow rules |
| UI System | UI framework in use, screen structure, data binding, navigation flow, and how UI screens update |
| Asset & Data Model | How content is stored and organized (prefabs, ScriptableObjects, Addressables, saved data) |
| Project Structure (Repo & Folder Taxonomy) | Repository and folder organization, conventions for structural consistency |
| Technical Dependencies | Unity version, render pipeline, packages, plugins, SDKs, and required external services |
| Build & Deployment | How to build, test, and deploy the project locally and through automated pipelines |
| Style, Quality & Testing | Code standards, performance targets, profiling practices, and test expectations |
| Notes, Caveats & Gotchas | Edge cases, limitations, warnings, and common pitfalls |
The 11-section design reveals the intent behind the feature. This is not a simple file listing — it’s a structured form of the context a new developer needs when joining the project. The goal is to give AI a foundation for answering practical questions like “why is this scene loaded this way?” or “how do I add a new UI screen?”
How AI Context Referencing Works
Once Project_Overview.md is generated, the Assistant references it as context for every response. This means when you ask about your project’s structure or systems in future conversations, the Assistant can provide more relevant answers grounded in this document.
Here’s a concrete example of the difference it makes. Without Project_Overview.md, asking “where should I put scene transition logic?” gets you a generic Unity pattern. With the document in place — and the Architecture section noting “uses a scene manager pattern, SceneController handles all transitions” — the Assistant gives you a specific answer that fits your existing setup.
This difference is especially pronounced in Agent mode, which makes direct changes to the project. With a project overview document present, the Agent is more likely to generate code and place files in a way that respects your existing architecture and conventions.
Manual Edits and Overwrite Behavior
The generated Project_Overview.md is a plain Markdown file — you can open it in any text editor and modify it directly. Common uses include filling in details the AI missed, or adding team-specific conventions and warnings to the Notes, Caveats & Gotchas section.
There is one behavior you must be aware of: running Refresh Project Overview again overwrites all manual edits.
To preserve supplemental content, keep a separate note file, or re-apply your additions after each regeneration. This is a limitation of the current version (2.7), and the entire team should be aware of it before making manual edits.
Conversely, if you want the Assistant to stop referencing the project overview entirely, delete Project_Overview.md from the Assets/ folder. Without the file, the Assistant will not use it as context.
When to Regenerate
Project_Overview.md is a snapshot taken at the time of generation. As the project evolves, the document needs to be updated. The official documentation identifies the following as triggers for regeneration:
- Game Flow changes — scene transition logic, game state structure, or the user loop has changed
- Dependencies changes — Unity version upgrade, package added or removed, external SDK changed
- Scene Organization changes — scenes added, deleted, renamed, or their roles reorganized
- Folder Layout changes — project folder structure reorganized, namespaces cleaned up
- Asset Contents changes — major changes to ScriptableObjects or Addressables structure
On the other hand, regeneration is not needed after changes that don’t affect project structure — such as fixing a bug in a specific script. Since each regeneration consumes Unity Credits, it’s reasonable to regenerate only when meaningful structural changes occur.
Generate After the Project Structure Stabilizes
The official documentation states that “generating a Project Overview when your project structure is relatively stable is the best approach for optimal results.” In practical terms, this means the following.
A document generated early in development — when scene structure and folder layout are changing daily — quickly becomes stale. The result is a growing gap between what the AI references and the actual state of the project, which can cause the AI to give answers based on outdated context.
By contrast, generating the document at a point where the structure has settled — such as near the end of a sprint or right after a milestone — provides valid context that remains useful throughout the following development period. Personally, I find it practical to regenerate right after merging a feature branch into main.
FAQ
Should Project_Overview.md be committed to Git?
The official documentation does not address this directly. From a practical standpoint, including the file in version control is beneficial — it ensures all team members provide the AI with the same context. That said, regeneration can cause merge conflicts, so it’s worth establishing a team rule to review the file before committing after a regeneration.
Can I use the Assistant while the overview is being generated?
Yes. According to the official documentation, you can continue using the Assistant while the overview is being generated. The scan and document creation run in the background, so there’s no need to wait for completion.
What happens if I delete Project_Overview.md?
Once deleted, the Assistant no longer references the document as context. Use this approach when you intentionally want to disable project overview referencing. To restore it, simply run Refresh Project Overview again.
How accurate is the generated document?
The Assistant scans the project hierarchy and analyzes its systems to produce the document, but since it’s AI-inferred output, it may not be 100% accurate. Review the content right after generation and manually correct any misidentified or missing information. Keep in mind that any manual edits will be overwritten if you regenerate.
Wrapping Up
Refresh Project Overview is how you make the Assistant actually know your project. It auto-generates an 11-section document and references that context in every subsequent response, eliminating the need to re-explain your project structure each time.
Three habits make this feature work well in practice: generate for the first time once the structure has reasonably stabilized; regenerate whenever game flow, dependencies, scene organization, folder structure, or asset contents change significantly; and manage any manual additions separately so you can re-apply them after regeneration. Follow these, and you’ll maintain accurate, up-to-date context without the AI referencing a stale document.
Related Posts
- Unity AI Assistant Ask, Plan & Agent Mode — Complete Guide — Differences between the three modes, when to use each, and real-world scenarios
- Automating Your Workflow with Unity AI Skills — How to eliminate repetitive prompting with SKILL.md files
- Unity MCP Custom Tool Deep Dive — Complete Guide to McpTool — Writing custom tools for external AI to call, with practical examples
← Previous: Part 4 — Automating AI Workflows with the Unity Skills System: SKILL.md Complete Guide
→ Next: Part 6 — Unity AI Assistant × Profiler: Diagnose Performance Bottlenecks in Plain Language